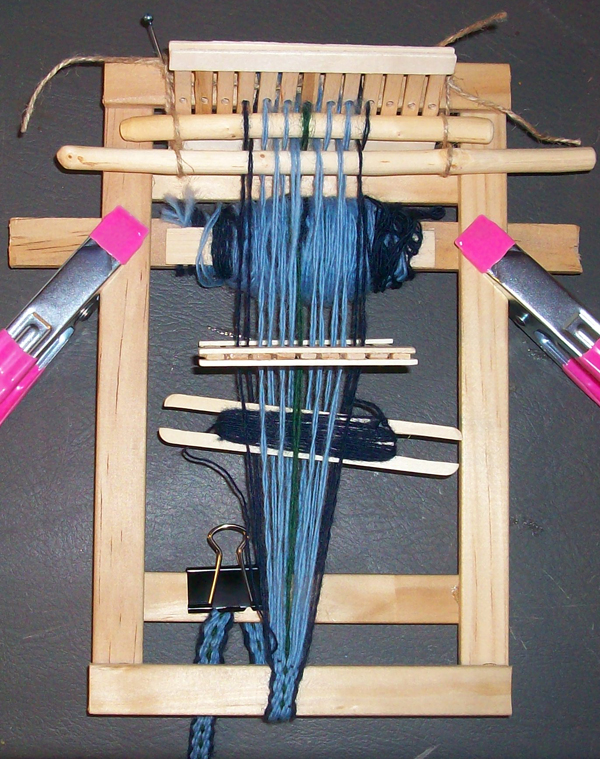
The Loom That Laura Made
The yarn here is handspun, and then plied, so it is a fine spun thread that has been plied into a two ply yarn.
I am using a single ply, thinner, weft thread, and this pulls it to give it a somewhat scalloped appearance on the sides of the finished ribbon.
This loom was made of thin wall trim, glued together with shoe goo. I made the shuttle and heddles also. More shoe goo.
The warp winds around another wood piece on the back, and I use the two clamps to anchor that wood piece so it won’t unwind.
I also peeled and scraped two pieces of elm branch, to use as raddles at the top. They separate the threads (use the heddle – drop it and insert one raddle, then raise it and insert the other raddle), so they don’t get tangled at the top of the loom. This is how I used it the first time.
Shown here is a SECOND heddle, right at the top of the loom, and I used that on this weaving, to see if it was easier to keep the warp threads from tangling as they unwound from the wood piece on the back. It did help – I didn’t use the raddles at first, but put them in later for this picture to show what they were supposed to be doing. Use of the second heddle there is not needed, it is just an optional thing. Once you start weaving, it doesn’t do anything to help things stay neater if the raddles are in use.
When warping the loom, the second heddle in the back can be moved out to the ends of the warp threads to keep them neat and even as you roll the warp onto the back stick. I kept that heddle just in front of the threads I was winding onto the stick, and it kept them neat and even as they went on.
I’m only using this for shoelaces. It is really too small for any other kind of compressed warp weaving, the heddles that fit it are just too narrow. I could use it for narrow balanced weavings that turn out the full width of the heddle, but it would still be mighty small stuff!
You can see the finished lace, and it is pulled down and wrapped around the back brace on the loom, and held there by a binder clip.
To advance the warp, I remove the binder clip, take off the two pink clips, and then unroll the warp stick. I then refasten the pink clips, and pull on the finished weaving to pull the unrolled warp thread up and over, through the heddle and raddles (again, only one or the other is really required at this point). I pull it very tight and re-clip the finished weaving to the back brace. All the rest of the finished lacing dangles off in a pile.
This loom is pretty tiny, and the working space (space between the obstacles at the top, and the frame at the bottom) where you can actually WEAVE, is very short. I have to advance the warp about every 4″. I think this is about as small as I’d ever want to make a loom for making ribbon or bands, or shoelaces.
People do use smaller looms – pin looms, tiny tapestry looms, H looms, and other little bitty things. They are used for small weavings, pieced projects, etc.
This little loom holds up to a 15 dent heddle – that means 15 holes, and 14 slots, for 29 threads total. If using larger yarn it makes a fairly wide piece, and the warp is not compressed. Once you go to band weaving with a compressed warp though, it narrows down considerably, and will only make half that width or narrower, depending on thread weight (the narrower the thread, the narrower the finished piece).
Is it fun? It is faster than I thought it could be – feels faster, anyway. The warping is tedious and awkward. The advancement of the warp is tiresome. The weaving itself is boring, as weaving tends to be. But it is a calm and simple thing to do when I’m tired, or when I’m occupied with something else and just need to keep my hands busy. I don’t really binge Netflix, I’m not the type anymore, but I do spin or weave in the evenings when we watch a movie, and sometimes during the day when I have to sit down.
I’ll be making another of these, much wider. I want to do wider pieces of compressed warp weavings, with band style straight weave and complex weave designs. I have more homemade heddles that have more than one row of holes in them, to vary the weave type.
UPDATE: I did make another wider loom to make wider weavings on, and when I made this first loom I had also made a beveled shuttle. It took several days of sanding and shaping (I only had hand tools to do it). It was pretty hard to do, and I had no motivation to do another one, especially the larger one I really needed. But I had a 4 inch one (Inkle style), when I discovered how to make a simple shuttle from popsicle sticks. I used the stick shuttle for several sets of laces, and found it to be functional, but sometimes awkward due to having to keep track of two ends as I worked it through the warps.
Today, three weeks after this initial post, I tried the beveled shuttle. It is FAR easier to use, it just slides through without hanging up. I’m really glad I learned to make the popsicle stick shuttle, but I’m much happier using the beveled shuttle.


